Sara explains how to build a mouse- and rat-proof vegetable garden cover, from PVC pipe and aviary mesh. Full step-by-step instructions, list of supplies and measurements provided.
When we purchased our fixer-upperer in country Australia, naturally one of the things we wanted to do was become self-sufficient and grow our own fruit and vegetables. However, even after five years of living here, we have to admit that our growing skills are not very good.
To be fair, it’s not just our underdeveloped green-thumb. Rather, it’s the things we didn’t anticipate, in particular, fighting with wildlife and pests that also had their eye on our vegetable supply. Our competitors are numerous and wily, ranging from wallabies and possums to slugs and rats. There have been so many times we have started to grow a nice plot of snow peas or spinach, only to see it decimated within days by some unwelcome critter.
This season has been particularly bad for rats and mice. As some of you may have heard, Australia is experiencing a mouse and rat plague, and since the bushfires and La Niña rainfall we have definitely noticed an increase in their population around our property. The rats have become so bad that we are unable to grow anything except the hardiest of plants and rhubarb (for some reason they don’t like rhubarb!). We could take the easy route with rat poisons, but we don’t like leaving poisoned carcasses that native wildlife and birds could eat, and subsequently die from.
In an effort to reduce the rat populations and regain control over our vegetable gardens, my spouse has been spending his time trapping rats with mixed success. My strategy is different, however. I decided instead to build stronger and more secure vegetable garden covers that the rats can’t get through.
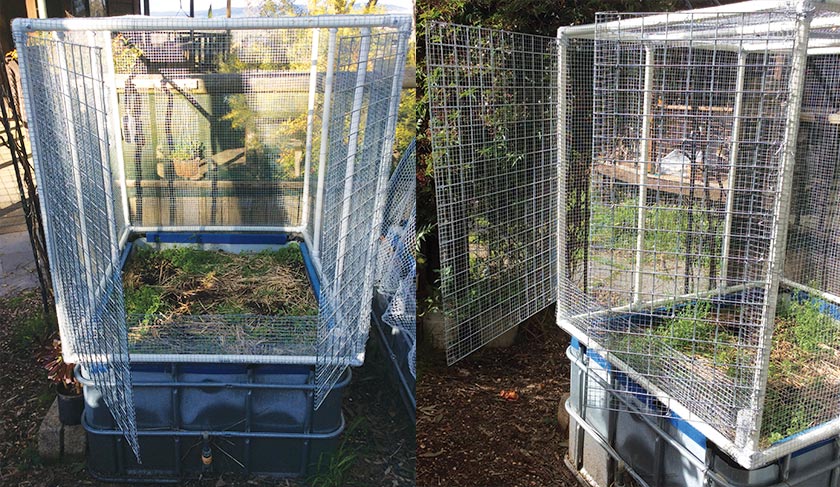
In this post I share my build instructions and plan for making a secure vegetable garden cover for keeping vermin out. This cover is measured to fit over an IBC wicking bed like we have, and is made from PVC pipe and aviary wire.
Introduction
Before we get started, I want to show you why such a strong vegetable garden cover is needed at all, when most people just use netting.
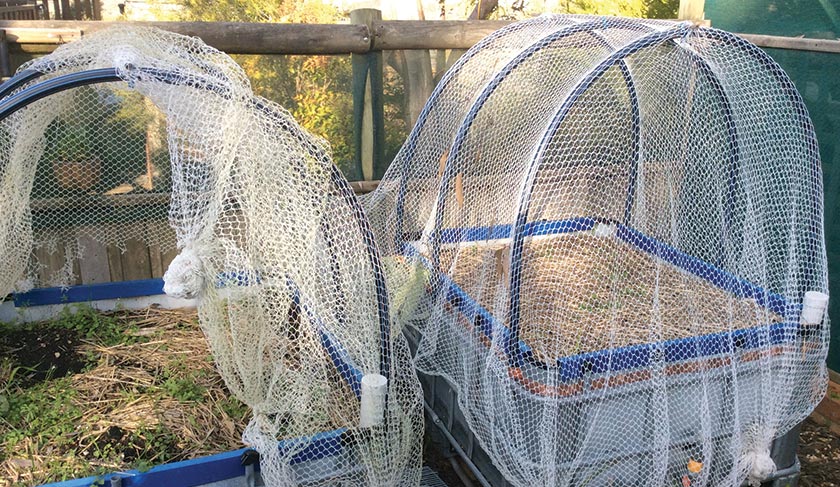
We originally had poly pipe with netting draped over the vegetable bed which worked fine (as you can see on the right garden bed), until this season when the rats became much more aggressive.
What you see on the left garden bed are rat holes chewed through the plastic vegetable netting (see back wall). Yes, all those holes in the netting were made by rats. Within 3 days, this entire spinach plot was gone, and those divots in the mulch are spots where rats pulled up whole plants. Unbelievable.
Rat-Proof Vegetable Garden Cover – Build Instructions
Step 1: Measure your vegetable garden
Because the size of everyone’s vegetable garden is going to vary, I won’t go into a whole lot of detail here. Rather, I will show you what I did, and you can adapt it to your own needs.
These measurements are based on an IBC wicking bed, which are quite popular in Australia at the moment. So, if you have an IBC wicking bed, these sizes may be precisely what you need. However, you should still double-check the measurements against your own IBC wicking bed, because I’m not sure if IBCs and IBC frames vary in size.
Have a look at the diagram below and the photos, as a guide for how to measure your garden cover.
Step 2: Buy your supplies
Once you’ve measured your garden bed, you’ll need to buy your supplies. Below are the measurements and supplies for our garden bed, but you will need to adjust them to yours, based on your own custom needs.
Being in Australia, our biggest hardware store here is Bunnings, which is where I purchased most of these parts. If you’re in the USA or elsewhere, the brands, sizes and options may vary depending on what is available to you.
It will be cheaper to buy the pipe in long lengths and cut them to size at home. PVC pipe is easy to cut with a handheld hack saw or similar.
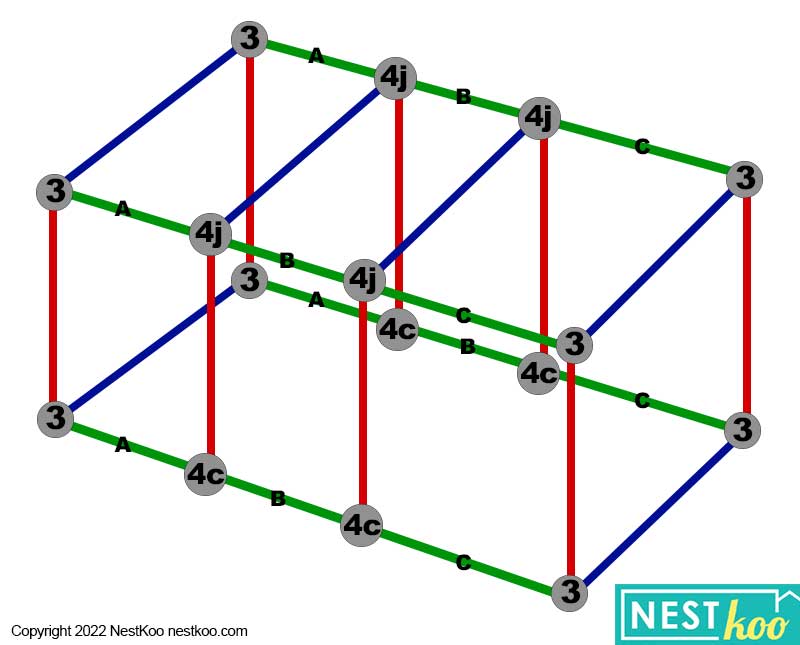
Here is a diagram I created showing the frame. Basically, it is a rectangle box covered on all sides with aviary wire, except the front and bottom:
Supplies List
Whites brand, 10m Roll Aviary Mesh (90cm x 10m) (12mm x 12mm holes)
Zenith brand, Bolts & Nuts, Mushroom Head, 6/16” x 38mm (50 pack from Mitre 10)
Rapid Mesh brand, 600x900mm 50x50mm Silver Wire Mesh Panel (Quantity: 2)
Holman brand, 20mm diameter PVC pipe:
- 4 x 333mm PVC pipe (LONG SIDE / LENGTH): GREEN “A”
- 4 x 431mm PVC pipe (LONG SIDE / LENGTH): GREEN “B”
- 4 x 318mm PVC pipe (LONG SIDE / LENGTH): GREEN “C”
- 6 x 945mm PVC pipe (SHORT WIDE / WIDTH): BLUE
- 8 x 1000mm PVC pipe (HEIGHT) or shorter if you prefer: RED
Holman brand, 20mm PVC connectors:
- 8 x 3 Way PVC Joint “3”
- 4 x 4 Way PVC Cross OR 4 x 3 Way T* “4c”
- 4 x 4 Way PVC Joint “4j”


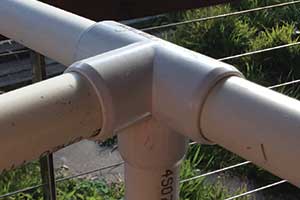
*On each of the long sides I used 4 Way Cross connectors because they have an extra bit that goes down, which rested on top of some metal vertical parts on the IBC frame. I did that so it would be more stable and not move around once placed on top of the garden bed. It’s handy when sitting on top of the IBC frame, but for other garden beds you don’t need that downward bit and should use 3 Way T connectors instead.
Step 3: Join the frame together
Now is the fun part – connect all the bits together. Following the diagram, or your own custom plan, connect your frame together.
Once you have put them together, put the frame on top of the vegetable garden to make sure the sizing is correct. You may need to make minor adjustments. Make sure you do this before bolting it together.
After you have put all the parts together and feel happy about the size, you will need to bolt the connectors together. You could glue it, but bolting gives the option of pulling it apart easily if you ever decide to repurpose it, adjust it or get rid of it.
To do this, drill a hole slightly larger than the bolt into each connector & pipe, then insert the bolt and tighten the nut. Easy.

Step 4: Put the aviary wire on the frame
Now, you’ll need to put the aviary wire on the frame. You want to cover all sides except the front and the bottom. On the front we’ll put doors, so make sure you don’t cover it.
I did this by cutting pieces of aviary wire the same length as each side, and then joining all the pieces at the corners with wire. Alternatively you could wrap the mesh around the frame, it’s up to you. This step is easier if you have someone to help. I did it by myself, but it was quite tricky trying to hold as well as join the mesh together.
On the front, I extended the wire for 5-20cm to cover the sections that the doors couldn’t reach, and to act as an extra buffer against vermin getting in. Keep in mind, if you follow my measurements the height is 1m, but the doors are only 90cm, so you will need some wire at the bottom to extend this further. Check the photos of the finished cover to see what I mean.
Step 5: Cut and cover the doors with aviary wire
Next, grab your Rapid Mesh panels (600x900mm) and check their sizing again your frame. You will need to shorten the width on one of the panels, so they don’t overlap too much. 3-5cm (1-2 inches) of overlap is good though. Mark where to cut, and then cut the panel with bolt cutters or an angle grinder.
Next, cover both panels with aviary wire mesh.
You may wonder why I didn’t use a mesh panel with smaller holes to avoid having to cover it with aviary wire. Good question. I was going to do that, but while I was in the hardware store comparing the two, the smaller holed one seemed flimsy and bendable, and I was concerned that vermin could get past it. The panel with 50×50 holes is much sturdier, and I felt it would do a better job ultimately.
Step 6: Put the doors on the frame
At this point, I put the frame on the vegetable garden bed, and then put the doors on.
To put the doors on, just join them to the frame with wire in about 5-6 spots. Position the wire in such a way where it doesn’t slide down the PVC pipe; it’s hard to explain but when you start doing it you’ll see what I mean and you’ll work it out.
Next, create a latch for the door. This doesn’t have to be fancy, I just used a loop of wire that is easy to take off and put on whenever access to the garden is need. Place the latch about 1/3 from the bottom (rather than the middle or top), so the closed doors don’t leave gaps at the bottom where vermin could climb in.
Step 7: Check and seal off any gaps
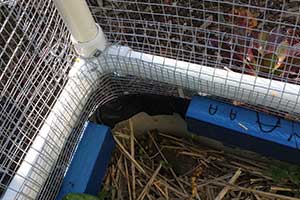
Lastly, go around your cover and check for any gaps that vermin could climb in. On our IBC wicking bed the corners are rounded, so there were large gaps at the corners, that needed fixing.
Next, you’ll need to fix these gaps. To do this, you can use some leftover aviary wire mesh, which is wired into place.
In my case we happened to have a roll of gutter guard, which was perfect. The small holes and narrow width meant it was easy to run along the inside to seal off any of those gaps. I also cut off some pieces to put on the outside of the corners, to make sure it was extra secure.
Lastly, secure your cover onto the garden bed with wire, to prevent it from being knocked off accidentally.
Step 8: Clean up and you’re done!
Last step of any project of course is to clean up, and put your tools away.
Now you’re done and ready to start planting! Hooray!
Wrap Up
After this point, you’re ready to prepare and plant into your garden. In ours I’ve planted some tomatoes, and haven’t noticed any signs of entry yet. I will need to keep observing it, but it seems very secure, so I would be honestly surprised if anything could get in.
While I am happy with this cover, the total cost of making this PVC pipe and aviary wire vegetable garden cover was more than I had anticipated. I think if making several of these, the costs could be reduced by buying larger pieces of pipe and mesh, and cutting them to size at home.
Next time, I will probably try my hand at making the frames from treated pine instead. However, that requires more building skills, while the big advantage of this PVC pipe option is that it is very easy for anyone to make who had very little idea about building.
The PVC pipe looks ok, but the clean white is a little stark. If you want it to blend into the rest of your garden better, then you may like to spray paint the plastic PVC a more natural color, ether before or after constructing.
I’d be interested to hear how your build went – feel free to share your thoughts and findings in the comments.
— Sara Kooring
Author
-

Hey, I’m Sara, co-owner of NestKoo! I’m a graphic designer and professionally trained fine artist, with a Bachelor of Arts (Fine Art) majoring in Painting. I love being close to nature, sustainable living and bringing new life to old things. My specialty in NestKoo is DIY house painting, upholstery and furniture upcycling, where I bring my skills in fine art painting and contemporary design together into a practical home DIY context.
View all posts

