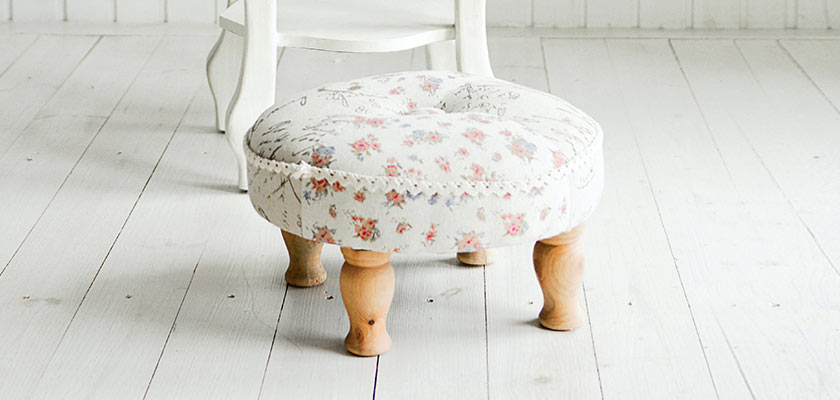
Looking for a simple DIY upholstery project AND put your feet up at the same time? If so, a DIY upholstery ottoman is for you! We explain step-by-step how to upholster ottoman footstools, from start to end.
An ottoman is one of those little luxuries that we rarely think about. Yet, at the end of a hard day, sitting back and putting your feet up with a glass of wine and a good book is worth looking forward to.
For me, an ottoman is an ergonomic necessity. If you’re a short female like me, you might find the height of most sofas to be too high for comfort, and an ottoman can help add a little extra height under your feet to relieve this issue.
However, like most well-crafted furniture, the price tag on a good quality brand-new ottoman may make your eyebrows rise. The good news is, upholstering one yourself is an easy project. Learning how to upholster ottoman footstools is a great way to start learning upholstery, and you get a sweet piece of custom furniture to add to your home.
In this article, we guide you through how to upholster ottoman footstools, from preparation to finishing touches. Let’s start making your very own custom DIY upholstery ottoman!
Why Learn How to Upholster Ottoman Yourself?
Customization
One of the greatest benefits of reupholstering your own ottoman is the ability to fully customize what it will look like when finished. You are in control of selecting the color, fabric, patterns, as well as texture that best suits your particular needs. Customization allows you to fit your ottoman into any space, and it reflects your unique tastes.
Cost Savings
Compared to the cost of paying a professional to reupholster your ottoman, learning how to how to upholster ottoman footstools yourself can save a lot of money. The biggest cost associated with reupholstering any piece of furniture is the labor. By reupholstering it on your own, you are able to save all of the labor that would otherwise go to the professional.
Skill Development
Whether this is your first reupholstering project, or you are looking to expand your repertoire, rest assured that by reupholstering an ottoman on your own, you will develop new skills. The physical act of the work will even help you to enhance your ability to pay closer attention to the finer details. Through the process of learning how to upholster ottoman footstools you’ll learn core skills that are transferable to other furniture projects.
Upcycling and Sustainability
Rather than simply replace an existing ottoman, you are able to contribute to a more sustainable world, by upcycling your existing furniture. You can repurpose just about any piece of furniture in your house, and give it a whole new life in the process. Not only does this reduce waste, but it minimizes your impact on the environment.
Sense of Accomplishment
When you discover how to upholster ottoman footstools and complete your first project, you will have a newfound sense of self-accomplishment. There is something amazing about transforming something old into something completely new and personalizing it with your own two hands. It gives you a sense of pride as well as deep satisfaction in your accomplishment.
Quality Control
We can’t forget to mention the fact that when you choose to do the project yourself, you are ultimately in control of the quality. You have the ability to choose whatever fabrics, foam, padding, and other materials you want. This will ensure that you get the highest quality output possible.
Creative Expression
As with any do-it-yourself project, you are in control of the creative element of the project. When you reupholster your own ottoman, you can express that project in any way you see fit. You can add details as you go, to ensure that it is perfect when finished. In the end, your newly recycled piece of furniture will be unique and it will complement you and your interior design capabilities.
Tools to Upholster a Footstool Ottoman
Before you embark on our ‘How to Upholster Ottoman Footstools’ DIY project, you’ll need to make sure that you have the following tools and materials. Not only will you need safety equipment such as goggles and gloves, but you also need some more specialized pieces of equipment that are specifically designed to help you accomplish the task faster.
List of Necessary Tools
- Heavy-Duty Stapler – learn more about choosing staplers here
- Upholstery Staples – learn more about suitable staples here
- Various Upholstery Needles
- Fabric Shears
- Needle Nose Pliers
- Ball-Peen Hammer
- Tape Measure
- Phillips Head Screwdriver
- Flat Head Screwdriver
- Electric Carving Knife
List of Materials
- Your Choice of Fabric
- Foam
- Batting
- Matching Upholstery Thread
- Upholstery Adhesive
- Dust Cover Material

How to Upholster Ottoman
Prepare to Make Your DIY Upholstery Ottoman
Naturally, before you can begin any reupholstering project, you need to prepare a workspace. Having a large flat area is crucial to ensuring that you are able to cut the material cleanly. Before following the steps for how to upholster ottoman footstools, start by sweeping up any dust, and making sure that you have all of your tools on hand.
Also make sure to take lots of photos of the ottoman before you start working on it, in case you need to refer back to how it originally looked.
STEP 1: Remove Old Upholstery
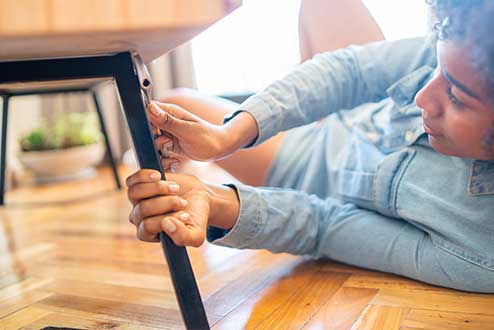
When it comes to removing the old upholstery, you are going to need to have a flat-head screwdriver, your pliers, as well as any other tools that will help you remove the old material from the ottoman. Once you have a good work area, and all of your tools on hand, go ahead and flip the ottoman so that the underside is facing upwards. This will make it a lot easier to remove any old upholstery.
Start by removing the dust cover. This is the fabric that is located on the bottom of the ottoman. You will find that this is generally held in place with staples, which can usually be pried up with the flat-head screwdriver, and removed with the needle nose pliers. Be careful when you remove the staples, so they do not damage the wood. This will ensure that you have a good surface to reattach to.
Next, you need to fully disassemble your ottoman. Start by taking a photo of the ottoman’s frame, and then look for any screws, nails, or other types of fasteners that are holding it together. Carefully remove all of these fasteners and disassemble the ottoman. You will need the photo later to help you reassemble it.
Finally, go ahead and start removing all of the existing fabric or material. Start along the edge, and carefully pull the fabric out. Just like the dust cover, the material will be stapled to the underside of the ottoman. Take your time and make sure that you do not damage the material, as it will be necessary to use the old fabric to create a template later.
STEP 2: Remove the Old Foam and Padding
Once you have removed any fabric or material, you should have nothing left but the frame, foam, and padding. Go ahead and inspect both the foam as well as the padding, to determine whether or not you will be able to reuse it. If you do not plan on reusing it at all, then go ahead and rip it off and throw it away. If you decide to keep the existing foam and padding, then carefully remove it from the frame. Chances are, that the foam may be stuck to the frame using some form of adhesive.
STEP 3: Clean and Repair the Frame
In order to clean and repair the existing ottoman frame, you will need to start by dusting it. Use a soft bristle brush, or a vacuum cleaner, in order to remove any dust or debris from the frame. Pay close attention to any intricate details and crevices, to ensure that you remove as much of the built-up dust as possible.
Next, it is time to spot-clean the frame. Find a clean cloth or sponge, and dampen it in mild detergent. Carefully clean the frame. Be careful that you do not oversaturate the materials with too much water as this can damage the older wooden frame.
While you are spot-cleaning the frame, pay attention to any sticky residue that you find. If you locate any adhesive or tape residue spots, carefully remove the adhesive using a mild solvent. You’ll want to use a separate cloth to do this, and carefully rub the affected area until the stickiness is gone.
From there, you will need to wipe down the entire frame with a damp cloth a second time, to remove any dirt or grind that still remains. As always, make sure not to go overboard with the water, because you do not want the wood to soak up too much moisture. Once you have wiped down every inch of the frame, allow it time to dry before you begin reupholstering it.
Related Article: How to Clean Furniture Before Painting & Refinishing
How to Upholster Ottoman Instructions
Step 1: Adding New Foam & Batting
Chances are, that the old foam and batting were just too far gone. Cutting foam and batting can be difficult, but when you know the best steps to take, you can ensure success every time.
Measuring the Foam and Batting to Fit the Ottoman
Start the measuring process, by determining the dimensions of the top side of the ottoman. You will need to use your tape measure at this point, in order to determine how long and wide the area is. This will determine the size of both the foam as well as the batting.
Keep in mind that you may want to add additional thickness to the ottoman, to give it a more comfortable feeling. In order to add an additional 2 inches in thickness, you will need to add an additional 2 inches to both the length and width.
Carefully mark the foam, where you need to cut it.
Cutting the Foam and Batting for Your DIY Upholstery Ottoman
Next, use an electric carving knife in order to cut it. While it may be possible to cut with a pair of scissors or a box cutter, you will never get as clean of a cut as you would if you used an electric carving knife. Even professional upholsterers use them to trim the foam accurately every small time.
When it comes to adding the batting, you will need to lay it down on top of the foam and ensure that it completely covers the top surface of the foam padding evenly. At this time, go ahead and trim the batting, leaving about 2 inches of overhang along each of the edges. This will ensure that you are able to securely fasten the foam and batting to the ottoman’s frame.
Repeat this process for the four remaining sides of the ottoman.
Attaching the Foam and Batting to Your Ottoman
Once everything is cut, you can test-fit the foam and see how it looks on top of the frame. You want to make sure that it completely covers the surface and make any necessary adjustments before securing it to the frame. You will not need to use a spray adhesive in order to secure it, because the batting will hold it in place.
Lay the batting on a flat surface, placing the foam on top, and then place the ottoman frame on top of the foam. Pull the batting tight, and start by stapling in the center of each of the four sides. Then carefully staple all along the frame’s edges, ensuring that the foam and batting is pulled tight and evenly around the entire perimeter.
Once you have securely fastened your foam and batting in place, it is time to start adding your new upholstery.
Step 2: Cut and Position New Fabric
Hopefully, you did not completely damage the original upholstery material, as you will want to use it as a pattern to cut your new fabric. Make sure that you have pre-washed the fabric, and ironed it smooth. This will ensure that the fabric does not shrink once it has been securely fastened to the ottoman.
If the original design uses more than one piece of fabric, use a seam ripper to separate the pieces in order to replicate them. Place the old fabric on top of the new fabric, and carefully trace along the edges. Make sure to leave an extra inch along the edges, so that you have enough fabric to work with.
Once you have all of your pieces marked out, use a pair of extra sharp fabric shears to cut along the edges. You want the shears to be nice and sharp so that the material does not fray as you cut it. It can be very difficult to cut some types of fabric using worn-out scissors. If you do not have a good pair of fabric shears, you will want to pick up a pair wherever you bought the fabric.
Once the fabric is cut, if you had multiple pieces, go ahead and stitch them together. If the original upholstery material was a single piece, then you can begin to securely fasten it to the frame, just as you did with the dust cover.
Step 3: Use A Staple Gun to Attach It to The Ottoman
Properly stapling your batting and fabric to the ottoman frame is crucial to ensuring that the ottoman will stand up to everyday wear and tear.
In order to staple the material properly, you will want to:
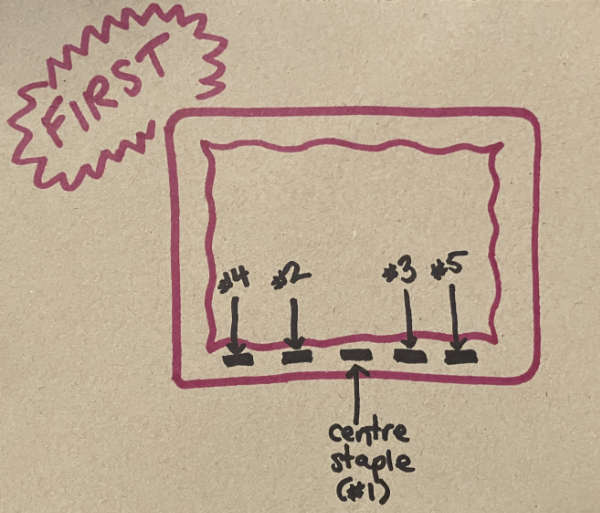
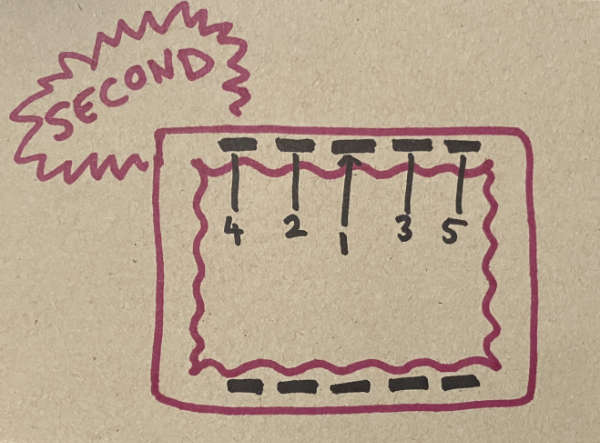
- Start in the center on one side, and place a single staple through the material into the frame.
- See Diagram 1: Alternate from one side to the other of the center staple, until you completely staple one side to the frame. Space your Staples about 2-3 inches apart from one another, and work away from the center out to the corners.
- See Diagram 2: Now you are able to pull the fabric tight and staple the opposing side to the frame. Just as you did with the first side, start from the center and work your way out by stapling the fabric to the frame every 2 to 3 inches. Be careful when you are stapling, to ensure that the fabric is straight and taut.
Step 4: Finish the Corners & Curves
Corners and curves can be some of the most difficult parts of any upholstery project, and will likely be the most challenging aspect of learning how to upholster ottoman footstools.
Once you have reached the corner, or have come to a curve in the design, you will want to carefully create tight, neat folds so that the fabric can be pulled taut and stapled in cleanly. If necessary, you may need to use some adhesive to hold the corners together, in order to give it that professional-looking finish.
Related Article: How to Upholster a Corner on Furniture
Finishing Touches to Your DIY Upholstery Ottoman
Since creative expression is an important part of re-upholstering your own ottoman, it’s time to start thinking about the finishing touches.
Trimming Excess Fabric
You will want to leave a little bit of fabric beyond the staples so that the fabric does not just fray along the edges. Leave about 3/8 to 1/2 inch and carefully trim any excess fabric still underneath the ottoman. Check to make sure that it looks smooth and presentable. Always work carefully and pay close attention to the pattern of the fabric, to ensure that it is aligned when finished. Once you have completely trimmed away any excess fabric, you will want to attach a new dust cover underneath to hide any remaining edges.
Adding Decorative Elements
You may also decide that you want to add some form of decorative elements to your DIY upholstery ottoman footstool.
Piping: Piping is an excellent way of adding a more eloquent design to your project. If you choose to add piping, you will want to do this before you attach the fabric to the ottoman frame. Chances are, if you are working with a design that previously used multiple pieces of fabric, then you will have already added piping along the seams.
Tufting: Tufting is another excellent way to add a touch of elegance to any project. If you plan on adding buttons to the cushion, then you will need to make sure that there are holes in the frame before you attach the foam and batting. This hole will play a crucial role in ensuring that you can pull the button tight, giving it that professional finish you are looking to achieve.
Nail Heads: You may even want to add fancy nail heads in order to give it a more sophisticated look. There are a wide variety of different nail head tacks that can be found at local craft stores which can simply be hammered into the frame using a rubber mallet or a ball-peen hammer. If you plan on using decorative nail heads, just make sure that they are evenly spaced.
For more tips on adding tufting to your DIY upholstery ottoman, check out this video about tufting from Design Essentialz here:
How to Upholster Ottoman Footstool Wrap-Up
If you’ve been following along with this how to upholster ottoman footstool tutorial, you should by now have a pretty nice little footstool below your feet. Here are a few final tips to help you along:
- For free or cheap ottomans to reupholster, visit your local charity store or garbage tip. Working on a cheap or free footstool will free you up to play with the upholstery techniques, without stressing about damaging expensive furniture.
- Choose a simple design when first learning how to upholster ottoman footstools. Avoid ottomans that appear to have complicated designs built into them, like an opening box lid or handles. For your first one, just get a simple ottoman.
- Learn some basic sewing skills. Understanding the basics of sewing and working with fabrics is fundamental for most upholstery projects, and will make your project easier to carry out.
- To simplify the project, don’t worry about extra decorative elements. These are optional, if you feel capable of doing them then great, but if not it’s not a problem to leave decorative elements off.
- Keep your expectations low. If this is your first or second upholstery project, it wont be perfect, and that’s ok. If you don’t like it, just start again. Practice and repetition makes perfect.
- Have fun and express yourself. Choose your own wild patterns and colors, and enjoy the creative process.
Once you’ve learnt how to upholster ottoman footstools and made your own DIY upholstery ottoman, why not try another similar upholstery project?
Learning how to upholster a bar stool uses many of the same techniques, and both ottomans and stools features a similar shape and design (I mean, it’s called a foot-stool after all, right?). You can even try your hand at making them a matching set!
Happy upholstering and upcycling!
Author
-

Hey, I’m Sara, co-owner of NestKoo! I’m a graphic designer and professionally trained fine artist, with a Bachelor of Arts (Fine Art) majoring in Painting. I love being close to nature, sustainable living and bringing new life to old things. My specialty in NestKoo is DIY house painting, upholstery and furniture upcycling, where I bring my skills in fine art painting and contemporary design together into a practical home DIY context.
View all posts


